Epiphany-
The jeep will be a runner by the Jeeps 40th birthday.
Tuesday, January 22, 2013

Saturday, January 19, 2013
rear bumper and roll cage beginnings
I got a bit inspired after getting the rear bumper finished. The hole on the left is the exhaust

So I started measuring, measuring, and measuring THEN bent the tubing for the cage . I measured
with the top on several different times to see what could happen and kinda went for it.


So I started measuring, measuring, and measuring THEN bent the tubing for the cage . I measured
with the top on several different times to see what could happen and kinda went for it.
 |
| This isn't mine, but I liked the looks of it. |
 |
| The front tube is vertical, the rear is slanted at 65* like the top. Tubing is 1 5/8" dia .120 wall A500B |
 |
| The bars went into many different positions before settling for corner mounted bars. This gave a lot of headroom for the rear passengers. The initail plans are to run some extension tubes to the windshield like the wranglers had. The windshiled doesn't fold so this would be practical, and if I want to go 6 point later the tubes can be added in. |

 |
| ok- how to explain this- some commandos came as a convertable, and there was a hollow area that a small rear passenger roll down wing window was mounted. Not the best idea, but upon observing this I realized that it would be better to utilize this waste of space than to use up the precious floorboards. The roll bar fits onto a footer that is in the void and the outer rocker armor and inner floor bracing are bolted through this. To make it look better- and take care of the sharp edges- I broke off the spot welds to the rear cover of the void (where paint ends on right) and moved it to the left of the roll bar and re welded it. The ginormous hole will have a plate bent to cover it with a drink holder in it. |
 |
| An upper view of how short the void is now. Replacing this piece also strengthend the door latch. The black piece of plastic was cut down to fit the hole. Whatever engineer came up with this needs to be flogged. |
 |
| Here is the basics of the cage- Somehow it came out pretty straight. After thought of all of this is when I tried opening the tailgate and the handles cleared the rear bars by 1/4" on both sides. ---------------------------------------------------- Roll bar frame supports are done on the rear. I cut a 4x4 piece of square tubing down on the corners to fit the rear frame crossmember that the rear springs mount to. A 3/16 plate w/ two 9/16" holes has 2 of the roll bar bolts through it so if it has to move a little it can. A piece of roll bar tubing resides between the two. The roll bar and supports have a layer of rubber insulation between them and the body to reduce squeaks also.  This was where the hat channel usually collected dirt and rotted out. Another Jeep engineer that needs to be flogged. |
Monday, December 3, 2012
timing is everything
OK- so you can't set the timing on a tbi chevy like normal
without the chevy computer screwing it up I found.
On the 88?-95 chevys- you must: ( I read this somewhere)
warm up the engine, Disconnect the tan w black wire coming from the distributor to the
computer (this in turn confuses the computer until it gets re connected)
*Note: on my 1995 wiring harness- unless I took it out before installing because I didn't know what
it was for- there was no disconnect plug on the tan/black wire. I had to put one inline.*
With your timing light hooked to the battery posts and the pickup hooked to the number 1
cylinder wire, AND the bolt clamping the distributor down loosened lightly......
start the engine making sure to avoid the fan,belts and anything else dangerous-
set the timing line on balancer to 0. The engine will run poorly during this.
(one site stated worn engines can be set 2 to 4 to compensate for slop)
Stop the engine. Tighten the distributor bolt. Make a mark from the distributor to the clamp
marking where 0 was. Plug in the tan/black wire back together ( slap some dilectric grease
in there) and be amazed how much sputtering disappeared the next turn of the key.
Basics
http://www.youtube.com/watch?v=UYGU7mTwsZc
heres the video i watched until 2:42 then blah blah blah.
http://www.youtube.com/watch?v=nWdmNozRMq0&playnext=1&list=PLPzooiAXSIgTeZw6Eckf5FkKyWtAxeZx4&feature=results_video
Saturday, November 24, 2012
I found Hoffa...and now with rock rails on both sides

Ever wondered whats in the rocker panels?Please don't judge me for chopping on a decent jeep body. This is the better of the two sides and it had a bit of rust in it. The other side
is way more trashed than this.

There's Jimmy!

 |
| All of the dirt came through what was supposed to be drains. There are a couple inboard drains near the supports, and two large holes with plugs- one up front on the bottom (missing) and one on the end near the rear tire.  |
..
In order to keep the body lines the same I left 2" of rocker Under
the door you can see the tail light wiring loom.

 |
| Heres the initial cut to the rockers. You can see the rocker supports hanging down. There's 25" under the rockers now. The new rocker guards will bolt to the body and supports. For reference the aluminum platform is 20" tall. |

The curvy cut was so it matched the jeep tj fender
flares. The original fender turn light will be removed
and flushed with the body.

Heres the flares in place

Jeeps 1973 marker lights with two tabs removed from the rubber housing
fit the 2005 tj light housing perfectly.
--------------------------------------------------------------------------I ended up cutting all of the original rocker panels under the doors all the way through to the inner
piece. I had heard that when these were cut off and left without support, the door will either
a: not open after wheeling, or b: not be able to close again.
 |
| The rusted piece is the inside of the original rocker panel. It comes down about 2" from the floorboards. The new rock rails have a piece of angle iron that I drilled and welded nuts on the inside so it would be a bolt on piece. |
 |
| With the exception of the door cut out and the endcaps, here it is in situ. The upper plate is 1/4", the tubing is 3/16". If this thing dents, there's bigger things to worry about than a rock. |
 |
| The places with the arrows are 4" bolts. These 4 bolts go through voids. On the drivers side the brake wires run through here. |
--------------------------------------------------------------------------------------
12-17-12
What to do on a 75* day in December
 |
| Since I had an inkling (an idea) of what to do, this side only took a couple hours instead of a couple days. |
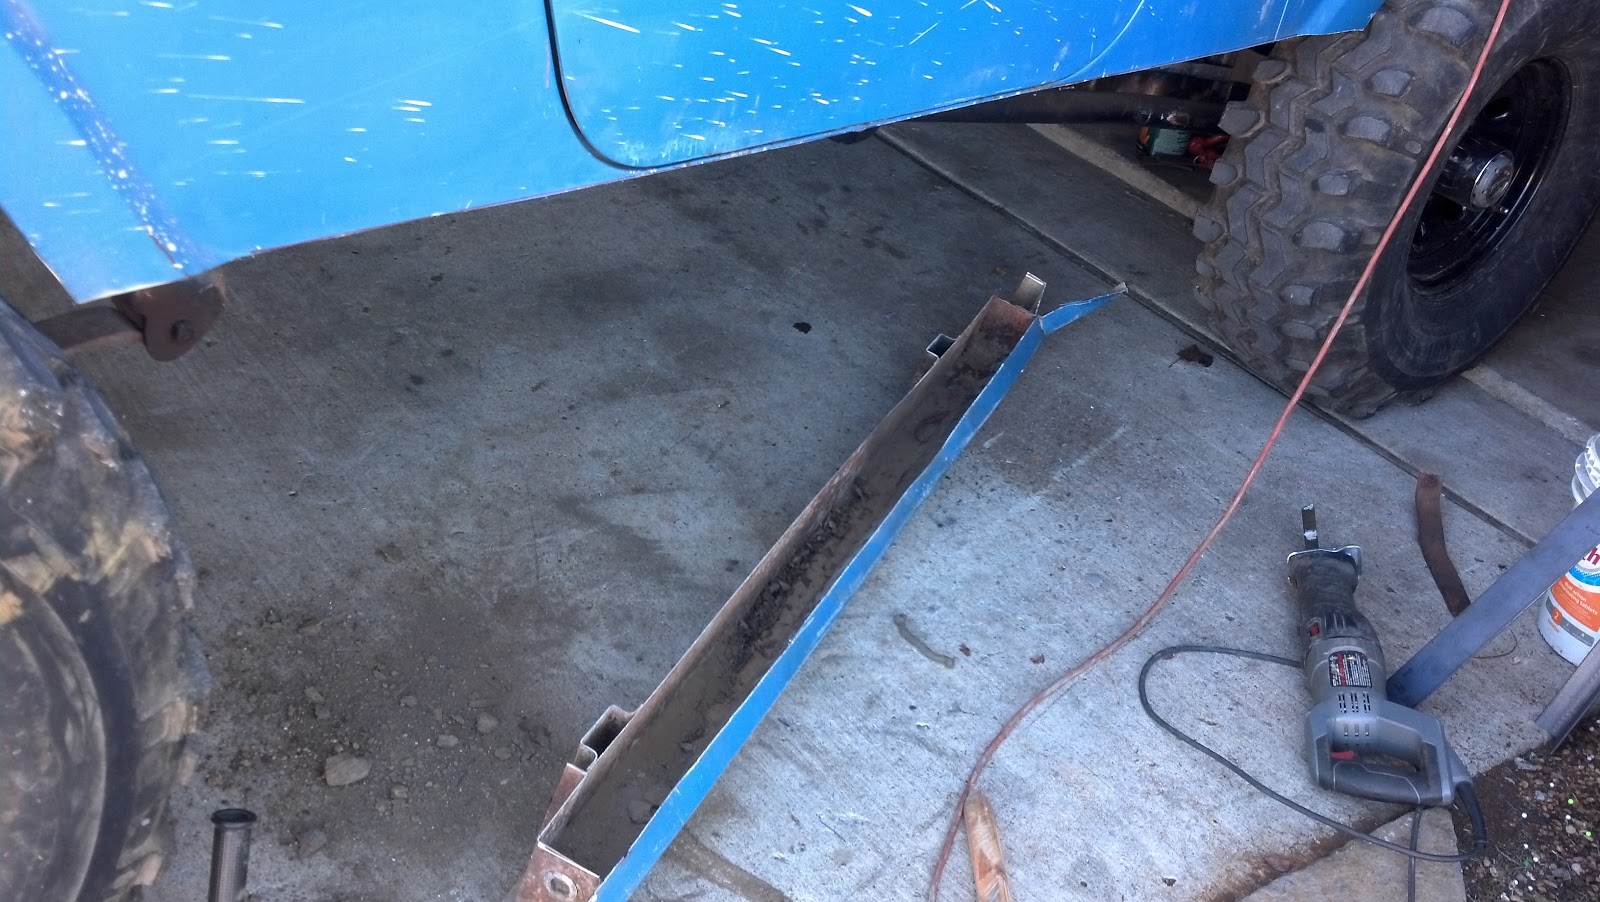 |
| I cut at the bend on the outside with a cutting wheel, and a sawzall took care of the rest. Again- the amount of dirt trapped in here is why these things rust out so easily. |
 |
| Here is the angle iron bolted onto the inside of the rocker panel (the top of the pic is the door, the tiny little piece above the rust is the door pocket. The passenger side was in great condition because it wasn't used as much. .. the inside piece had several places where the metal was double layered and thats where the bolts went through. |
 |
| I had match drilled the angle and this outer plate with the others to keep them symmetrical. I used the body seam next to the front clamp vs. the front bolt hole as a positioning mark. ---------------------------------------------------------------------------------- drivers side "done" with door opening cut out  |
 |
| And voila- the finished product. The "white caulk" is 3m #8500 seam sealer. This stuff is supposed to remain rubbery "forever". And it better for $27 a tube. I've seen it as low as $17 online + shipping. Paint is low gloss duplicolor ceramic engine enamel. |
----------------------------------------------------------------------------
just to keep the rear looking as good as the rest of it, I made some rear armor
- its not as thick as the rest, but strong enough to use a jack under.
 |
| it has 2 large bolts through the middle, and a hidden bolt through the ends of each side. |
 |
| Here you can see the part near the tire- it has a washer welded to it that the fender flare rivets to. The rivets are the new fangled plastic type and are supposed to hold 50 lbs each. |
Sunday, November 11, 2012
Fender trimming

I started trimming one inch down from the original flare- but after just a bit of that I held up
the tj fender flares and decided to go for broke

Thats enough metal to build a kia out of...

After the carnage... its just clamped on right now to figure out the next step.
I'm planning on tack welding the original lip back onto the edge of the fender to strengthen it and
give it a finished look.
Tuesday, October 23, 2012
Front AND rear shocks
again...
If you would examine this-
http://jims73commando.blogspot.com/2012/02/rear-shocks.html
Its the same shocks and setup. Yes, the shocks survived being dragged all over hells half acre.
Gabriel shocks for the front of a full size blazer being used on the rear of the jeep.
THIS time- not being in a rush to finish I found that the upper shock mounts were too
far outward- they were moved in 2" each and the lower mounts were dropped to mid axle.
The shocks in this configuration are at just a bit less than half travel. Fully compressed
they will be up above the spring u bolts.
The jeep has became a lot less jiggly in the rear and has lifted about 3/4" from this.

 -
---------------------------------------------- 12/31/12 Front shock mounts started...
If you would examine this-
http://jims73commando.blogspot.com/2012/02/rear-shocks.html
Its the same shocks and setup. Yes, the shocks survived being dragged all over hells half acre.
Gabriel shocks for the front of a full size blazer being used on the rear of the jeep.
THIS time- not being in a rush to finish I found that the upper shock mounts were too
far outward- they were moved in 2" each and the lower mounts were dropped to mid axle.
The shocks in this configuration are at just a bit less than half travel. Fully compressed
they will be up above the spring u bolts.
The jeep has became a lot less jiggly in the rear and has lifted about 3/4" from this.

Same crossmember, shocks moved closer together.

---------------------------------------------- 12/31/12 Front shock mounts started...
 |
| Heres the towers laid on the side- I taper-cut the gussets on the orange line. |
 |
| f350 shock towers with "custom lift kit" the lift kit is a bracket for the frame and some gussets |
 |
| The shock tower was mounted using engine mount bolts. I had to trim into the inner fender a little to fit these due to the height. The lower bolt is drilled through and welded on the spring perch. What is left on shock travel at rest is 5" compression and 8-9" downtravel. New "tatton" front driveshaft should be here 1-3-13!!! I'll give an update on that when it arrives- so far customer service has been good. |
Monday, October 22, 2012
chevy engine control stuff
Ok- so the engine runs good, but not great. The symptoms are- it runs better after getting up to temperature, and between 2600 and 3000 rpm it kinda runs rough/ sputters until after 3000 rpms.
So after cruising the internet- I came upon the likely culprits- (in order of popularity)
1 O2 sensor $45
2 coolant sensor (the intake manifold one - not the temp guage one between #1 &3 cylinders) $17
3 Throttle position sensor $44
4 map sensor $??
5 electronic ignition timing in the distributor cap $80 is the cheapest I've found.....
6 timing, timing chain, vaccuum leaks, wires, plugs, clogged fuel filter, fuel pump, fuel
regulator, clogged fuel injectors, blah blah blah.
too many parts- as simple as this fuel system is- the K.I.S.S. principle does not apply.
So I started on #1 and 2. The revving problem went away almost immediately.
I also turned the timing up a few degrees which also helped- although after 3700 rpms there is
a little bit of popping coming from the passenger side exhaust.
I am going to change the thermostat to a 195 stock because if the engine doesnt get to temp the coolant sensor tells the computer its -40* outside.... duh
The original coolant sensor tested good- so its a spare.
The jeep now has more power and will do a powerbrake burnout.
Subscribe to:
Posts (Atom)