Total Pageviews

Saturday, September 28, 2013

Front roll cage hoop. v1.2


After getting back into shape to do manual labor again, I decided to get the roll cage completed, at least started to be completed.


Due to the dash design of the commando, I had to come up with a place to put the roll bar.
It is made with 3/16" with 1/4" side plate ( here unfinished)
The outer windshield bolt between the soft dash and the window bolts through
the  lower plate- thus hopefully giving some surface area/ support
the upper edges are what the roll bar pad will mount on then bolted through the back.
I'm planning on bolting the 1/4" through the side of the dash and put a leg  down to the floorboard.


And here's the product-  My friends $14,000 tubing bender didn't like the 1 5/ 8" diameter a500 tubing the rest of the
cage was made from, so I bought some of his 1 3/4" dom and he bent it for me pretty accurately.
The lower outer arms are 51" outer to outer, and since its set at about 60* like the windshield the height is 16"
The lower cross bar is the 1 5/8" tubing.

If you'll note the mounting feet that go onto the dash supports with the holes the bolts go through.
The edges of the feet have a double bracket that captures the 1/4" side plate


            And the final product...  It doesn't block the window much, and the top can still be bolted on.
I'm going to play with a couple designs for the rear cage to the front.

10-31-13
Since the roll cage is "tight" to start with inside the top, I decided to go with a opening to keep it as easy as possible to get to the back seat and into the front seats. It came out easier to get into than I expected considering I'm over 6-1. There will be gussets added from the
front hoop to side bars

To keep everything looking the same- I made a 30* bend  and shaved it to fit on both sides.
If nothing else- it looks good.


With padding installed
February 2014 update...
It still runs- Got the flat fixed, Getting ready for megarun again.
Finally got a scout 2 parking brake cable & hoping to get it road legal sometime.
I got a nice rear seat for it, now I'm looking at some mid-high front seats
(like a CJ7 style). 

Friday, August 16, 2013

Post wheeling report

I got the urge to go wheeling just for the day.  August, in Texas, 102*, little to no breeze= perfect.
At least the park wasn't busy. 
There was a cold front coming in during the afternoon, it was supposed to get down to 98*
Rich took his nearly stock 06 TJ along just in case.

We wheeled the entire north end of the property, everything had changed from March at megarun.  The easy trails
had extra drop offs, and wash outs.  We went down "old town trio" (blue arrow, that had also washed out) Rich took the bypass
and I took the trail.  It was severely off camber turning down and right to a 2-3' drop off.  After going off the drop off
I heard/felt a sound go through the chassis when we landed on the front axle heading straight down the trail.
 
 
The new steering was doing its job , but after about 6 hours the steering was not doing as good.
I had checked the tie rod ends and found no problems.
I started up spider ravine (bottom of the map) and the first right turn the jeep kept going
straight
off
 the
 trail.
 
Dang.


Rich swears it was the stump that I ran over, but it had to be the drop off. 
As soon as I fix one problem, it moves to a new spot....
 
The notch I had to put in the crossmember for the chebby Saginaw steering box turned into a crack!
It would turn left okay because the crack would shrink back up, but the right turns opened up
the crack and flexed the crossmember and drivers side frame.  At full right turn the pitman arm was 30* off of center but the tires weren't turning.
We did a 20 point turn around to get back to the main trail and back to the trailer.  I'll weld that up and reinforce it with something.  Maybe duct tape.


Also found that part of the idling problem was one of the 3 pins on the map sensor plug had backed out a little causing an intermediate short, egr sensor wasn't sensing, and the damn chebby tbi has
another vacuum leak at its base. Oh yeh, and a tps.
Beyond that- great trip.
Frame re welded...

1/4 x 1.5" bar strap

Gusset around the notch to strengthen/ transfer some of the loads

The finished product.
There may be a TJ style steering box cover in the future too.


P.S. oh yeh- after filing the base flat & rebuilding the tbi, the engine idled smoother, but would only idle at 500rpm.
After plugging and unplugging the various lines, I noticed the engine idled better after loosening
the idle air control.  After shutting it off and unscrewing the iac I heard a hunk of metal hit something- after looking for a dropped socket or something and not finding it, my attention went back to the iac, only to find that the spring was laying next to it and the plunger had shot off to
who knows where.  There's your problem....


New IAC showed up, it idles pretty nice, unfortunately it is 8pm, too late for a test drive right now.

Tuesday, June 18, 2013

1 TON Steering - FINALLY DONE!

otk= over the knuckle
trf = tie rod flip
high steer, whatever you want to call it...

These are tapered inserts that I got from TMR in Oh! Canada!
There are similar ones from local dealers too. The shipping
to TX from Ontario was more than the inserts...
They are weld in type and require drilling a 1" hole in your steering arm.
I held the industrial drill steady while a buddy sprayed
 cutting oil on the bit to keep it cool.

The insert gets installed upside down to get the taper going the right direction.
Some companies require you to get a $80+ reamer and some mini inserts
to tap the existing hole. I dunno which way is better...

The adapter welded in and ground even with the arm.
weld all the way around


I hope I cut the right part!

Here's the chebby one ton steering y link.  The dom tubing still needs to be cut to length.  It weighs more than the axle.
I'm not kidding.
News:  I originally installed a jeep j10/ wagoneer  drop pitman arm with the same pitman arm rod end
 on the chebby steering box.
This has the same threads/ diameter (although not as long) as the chebby rod end that came with the kit, so I am going
to stick with it unless there is a problem.
The steering ratio from pitman arm length to steering knuckle length should be almost even again
so steering can be quick again like with the old scout arm :)

Delays, Delays: The Super Swampers barely rub against the new steering linkage. Just barely. So just for kicks I'm going to
get some 1" wheel spacers.
It needs a minimum of 3/8" clearance not to rub, but will get more.


Update Many months later... I got a superduty with low miles that needed a few things first to be a daily driver / tow rig (front axle gone through, all fluids $$$!! ya know.) so that took all the money and time from this project. The good news is that I have gotten some 1.25" wheel spacers for the jeep, eyeballed the alignment, welded up the steering, and everything is working and driving again.  
This is it with the body lifted (axle droop ) of about 4". 
At rest the pitman arm is a little lower than the cross tie rod.


Side note- I don't dislike wheel spacers- but if you use them, tighten them down- way down and
red Loctite them from loosening up.

Saturday, May 18, 2013

New replacement pieces

Christmas in May:
All in 24 hours a Ballistic Fab chevy 1 ton Y steering link system
and a new replacement wheel showed up.
The steering tie rods are 1.5" dom , 1@50" and 1@58" about 32 lbs
The rod ends are the big 7/8"suckers. 
 Instead of reaming the steering knuckles I bought some pre tapered
 weld in inserts @ $8 each.  All that is needed is a
3/4" drill bit to re drill the steering knuckles.

New Cragar:
Why the 7" wheel do you ask for a 36" tire?
Well, it didn't pop off while wheeling at 6-10 psi, so why switch.
Plus at $67 with shipping they're cheap replacements.
And tough.. this is the dented front rim, a little hammering back into shape and
it now holds the spare tire just fine.
 
This thing has no arm rests or easy ways to get ahold of the door,   They were options- really.
 So I put on some arm rests from a geo tracker (Suzuki sidekick)
They aren't any deeper than the window crank so it doesn't hit you in the ribs
when the door closes.  The original mounting holes for door handles
is about 3" below (at the black rectangles) where I put them.  A little kid could
use them down there, but it isn't practical.
Lets face it - on this vehicle originality has gone out the window.

The hole is where the dspo tried to mount a speaker in the door before realizing
that the window would interfere.
 

Tuesday, May 14, 2013

Going topless

After scouring the internet for Jeep top hoists, I realized that Commando owners
are on their own pretty much.
The top is 125+ lbs ?? I'm guessing, but the darn thing is like trying to pick up a
bowl of jello.  CJ tops are pretty rigid, the sides on this flex and sway.

I was going to build one of these:
But the size of the top and the single lift point would let it sway if a breeze hit the garage.
So I built this:
 
 
After fabbing this up with the top off, I had some "help"( not much of it) getting the top 
back on the Jeep. 
The pulley system is a 3:1 system,  that means the end of the rope is tied to the tops frame,
goes through the ceiling pulley, back through the frame pulley, and back through a second ceiling pulley.
With this system, if the top weighs 150# pulling on the working end of the rope only takes
50# of effort to lift it.  This also means you have to pull 3x the rope to move the top up.

The lag eye bolts for the pulley are #0 and are long enough to screw into the 2x4 and the floor joists
There are also 4 other lag bolts holding each one. I tested these before hoisting the top by pulling
myself up from them.  No broken bones to report.
The rope is 230# safe working load, the pulleys are 440# safe working load,
I have a carbiner with a knotted pull rope going
through the knot where the front and rear ropes come together.
While on the interweb I saw these frames made of angle iron, rectangular tubing, to just plain
straps and rope thrown around the top. Mines made from 1" emt tubing.  It can be as simple or complicated as you want it.
AS LONG AS ITS SAFE.

The clamps are a 6" long piece of angle with a hole in it that
goes over the frame spacers bolt.
The frame sits in the rain gutter, and the angle clamps under the rain gutter.
So there's 12" of surface area per side lifting it.  So far- so good.
Best I can tell the CG of the behemoth is right around the very back rib on
the top due to the glass.
 

Thursday, April 4, 2013

super shafts?

I finally got off my keester and installed the new chromoly shafts.  The ears are much thicker
and compared to the original shafts that "clang" when set on the concrete, the new ones ring out a bit.
Sounds like the difference between bouncing a new quarter vs an older silver laden quarter.

The only cap left in still has the post of the ujoint stuck in it. 
Both of the u joints posts sheared off at the center body.
I still can't deduct if the ujoint let go first and screwed up the shaft
or the ear let go and let the cap come out, hit the bottom ball joint then
screwed up everything.
Anyone want to buy a slightly used axle shaft?


New shaft in.  I had no idea how easy it was
to put in the new u joints into a new set of shafts.
The new bottom ball joint is a Moog.  From now on
I'm replacing anything that breaks with Spicer or Moog parts.

Here are the new hubs.  They are the "premium" models.
I bet they weigh 3/4 the weight of the original hubs.
I wish I had gotten a picture of the outer dial,
the new ring (part with allen bolts) is hollow inside vs solid on the original.
Unless it gets hit it shouldn't matter though. It just has to keep a couple pounds
of spring pressure at bay.
The actual housing seems like the same design.
The old hub liked being assembled one way only to work, this
new one has a wave spring that doesn't seem to care how its aligned.
It turns smoothly and presses down the  toothed ring to engage the
axle shaft.


Shaft on the passenger side.
Note: remember to put the spindle seals and
washer onto the outer shaft otherwise
you will be removing and putting them in later.
Just saying.

Monday, March 4, 2013

what went wrong / right this year v1.1

Megarun was huge fun again.  Met up with friends and did trail runs Friday and Saturday morning before competitions. 
With the mods since last year- the commando went up and down stuff that was impassible last year.

This was the Friday night before shot..
 
 
Clydes ravine


This is the last 25' of the rock garden, everything went wrong
when it was thrown onto the drivers front wheel before coming
off the rocks.  Made it though...


http://www.youtube.com/watch?v=kqhu0g5cbnM&feature=g-user-f&list=FLq8wWTqr0LLVrDMzPMy6KdQ

This is the after the rock garden shot... slight alignment issue
Bent tie rods, bent rim, hurt the warn hub- didn't crack it- but couldn't pull dial off easily, snapped 3 ears off
axle shafts , snapped swivel joint and messed up lower ball joint.
1 hit on 1 rock in 1 wrong spot is all it takes.


This is the story of a trail that fell in with the wrong crowd- it used to be a fun suspension flexer
that everybody could enjoy-by the name of "twister" -then it went bad.
If you can't tell, the door handle is crushed and needs to be replaced.  Still works though.

No matter where I put armor, the rock would just jump out and hit somewhere else.
Out of the entire weekend theres this drivers side damage, and a, A SCRATCH on
the rock rail. humph!


This was our next door neighbor- and a fine example
of what the wheeling community does for its friends, and quite a deserving one at that.
  DFW TX4X4
helped him with this AWESOME wrap for his jeep, a year ago he had a heart
transplant and was advised to take it easy- fat chance!  This little cj5 went out and
mixed it up with the big boys easily!

--------------------------------------------------------------------
3-7-13
I ordered chromemoly axle shafts and parts for the front, should be in next week.
Should last a little longer if I stay off the skinny pedal.....

I'm planning on getting the 1 ton cheby tie rod kit- its supposed to
be over the knuckle, and with the scouts steering arms so high now-
it'll either never get touched, or crush the frame on the first bump.

http://www.broncofix.com/quinn/scoutknuckle.html

------------------------------------


New axle shafts came in- usa standard brand.
The reason I'm not capitalizing usa is that it is
probably not made in the USA.  :(
From what I read, usa standard is yukon brand
that didn't go through "a final touch up or finishing procedure".
(polishing, standard control, etc...)
I have read that the same shafts with yukon
will accept CTM joints and these won't.
A:  I don't care- got some Spicers.......
B: CTM would cost as much as the shafts


Sunday, February 24, 2013

aussie locker - in progress

BTW- after a COUPLE WEEKS, back country binders got my replacement front brake hoses to me- they seem to be of good quality and are DOT approved. Even though it was "cheap" pricewise compared to some other dealers parts   I don't know how they justify the $18.75 shipping cost for something thats 1 pound from Washington state to Texas...

OK- off my soap box....


This is in the rear end- fine for going straight, but for steering in the front its
generally regarded as horrible.


Thats why I got this- an Aussie locker- made in the USA

The instuctions note that if you have a thick ring gear- you will have to remove the carrier.
On my '92 Cherokee with the 8-1/4" rear axle and stock gearing the cross pin came right out past
the ring gear with no problems and everything was done in place- not so with a front end dana 44 and 4.56 gears.
Jack up the vehicle on a flat surface, chock the back wheels, and put the front axle on jack stands. 
My faithful 2 ton jack turned unfaithful the other day so don't trust them.
Start pulling the tires, brake calipers, locking hubs (yes, its old), hubs, caliper bracket and spindle.  Then
just simply pull the axleshaft out a couple inches. There's half an hour you'll never reclaim.
Mark the bearing caps so they go back in the same direction, grab a 3/4" drive and cheater bar then
get after the bolts.  A pry bar was utilized to get the carrier to pop out.


Here- the ring gear was removed already- the cross (drive) pin has a rolled pin that keeps it in place.  I found the proper sized drill bit and a nylon dead blow and tapped it out.  The pin came out pretty easily.

To get out the  spider gears rotate the gears and remove the smaller ones.  They have a curved thrust washer under
each gear that needs to be removed also.  One washer came out stuck to the gear- one stayed.


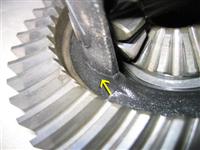
Note the side rib reinforecment the scout carrier has... BEEFY!  Compare this
to the pics on the early bronco site of that carrier below.


Aussie Locker Installation
This is the carrier off the early bronco
site showing the crack he has
in the carrier, no rib reinforcement...


Heres the locker installed with pins and springs- I didn't dare try to put in the springs and hold the camera at the
same time!  The Aussie requires you to get a clearance between the side cups and pin and then after installing
a clearance between the 2 inner gears that the cross pin goes through.  With the new , non warped, washer
and pin, everything was dead perfect.

The cross pin went in easily, the roll pin was a bit of a pain, but went in.


Re-assembly:

Re install ring gear & torque bolts.
Put carrier back into pumkin, torque carrier bearing bolts to spec
Put axles back in, reinstall and grease spindles, brakes, locking hubs
Put on tires and do the final Aussie locker test.
I put on a THICK differential cover to protect my investment (2X as thick as stock)
Fill with gear oil
Enjoy having an actual 4WD!

http://classicbroncos.com/aussie_locker.shtml